Core Product Tutorials
How to Use the Marketing Calendar
The Marketing Calendar is where your generated campaigns become an execution plan. After Axy suggests campaign briefs in Proposed Briefs and you click Generate, the generated content is added to your Marketing Calendar. From there, you can review, edit, approve, schedule, publish, or export content across GEO, LinkedIn, and X.
On this page
- Before you start
- Step 1: Open the Marketing Calendar
- Step 2: Review your generated content
- Step 3: Edit content where needed
- Step 4: Review internal links for GEO content
- Step 5: Approve content
- Step 6: Schedule or publish content
- Step 7: Manage content status
- Step 8: Use the calendar to plan your week
- Step 9: Track what happens after publishing
- FAQ
- Best practices
The Marketing Calendar is where your generated campaigns become an execution plan.
After Axy suggests campaign briefs in Proposed Briefs and you click Generate, the generated content is added to your Marketing Calendar.
From there, you can review, edit, approve, schedule, publish, or export content across GEO, LinkedIn, and X.
The calendar helps you see what is coming up, what needs review, and how each campaign fits into your broader marketing plan.
Before you start
Make sure you have:
- Completed onboarding
- Approved your marketing strategy
- Reviewed your channel plans
- Configured your channel guidelines
- Generated at least one campaign from Proposed Briefs or Custom Campaigns
Generated content will appear in the calendar after you create it.
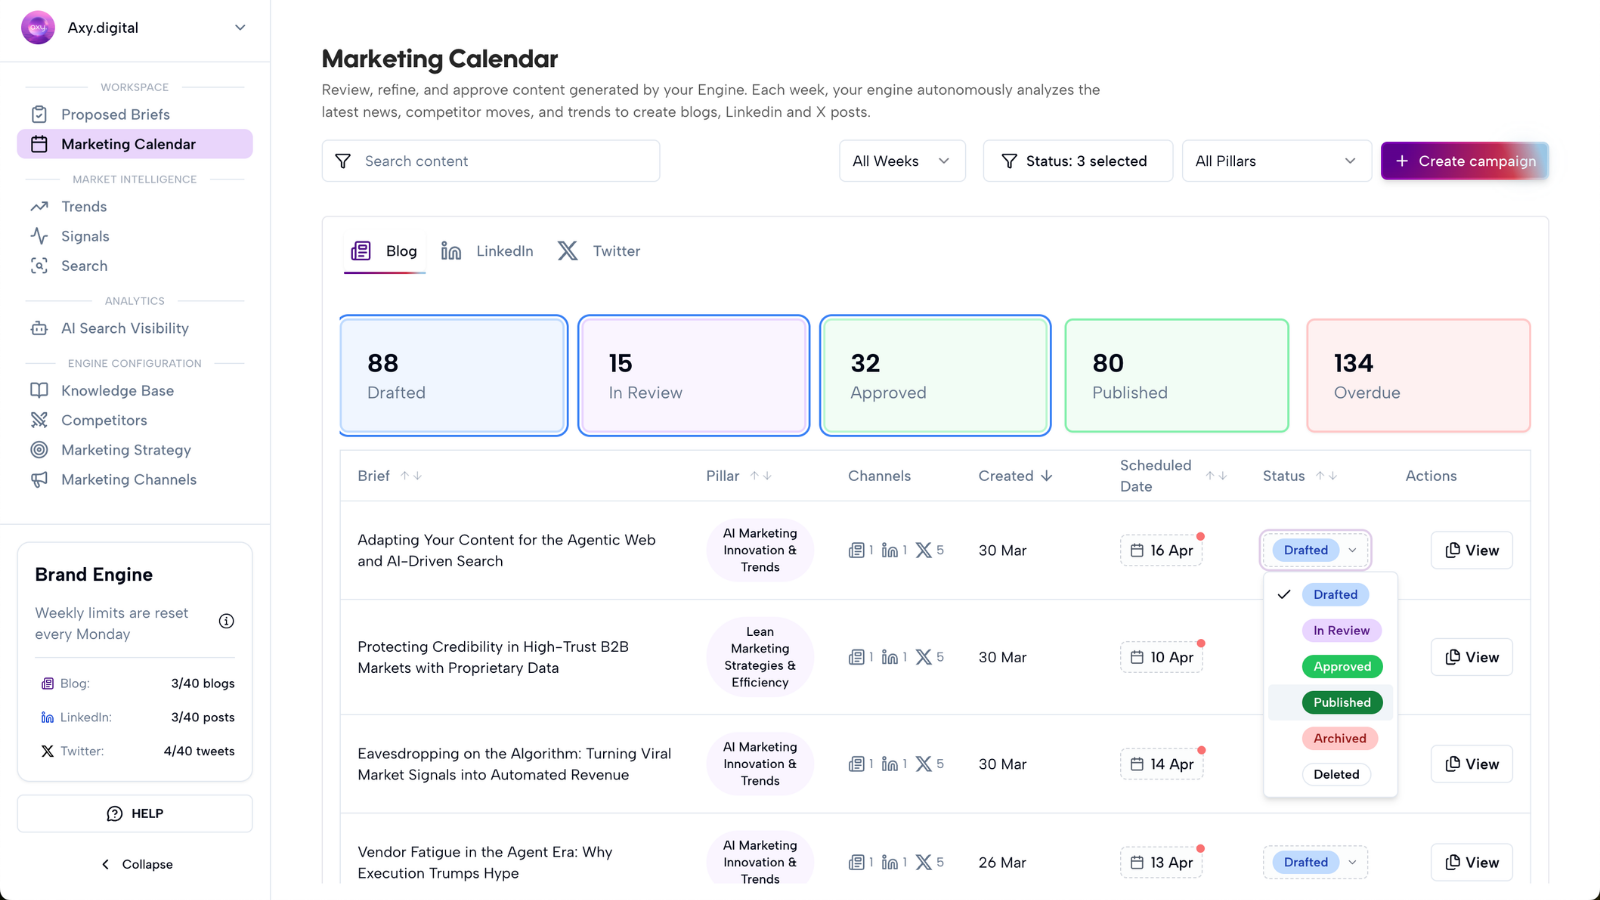
Step 1: Open the Marketing Calendar
From your workspace, open Marketing Calendar.
This is where Axy organizes generated content across your active channels.
You may see content such as:
- GEO articles
- SEO articles
- AEO answer content
- LinkedIn posts
- X posts
- X threads
- Product launch campaigns
- Case study campaigns
- Custom campaign assets
The calendar gives you a central view of what Axy has generated and what needs your attention.
Step 2: Review your generated content
Open any calendar item to review the generated content.
Each item may include:
- Campaign title
- Channel
- Draft content
- Source brief
- Source signal
- Target audience
- Suggested CTA
- Internal link suggestions
- Status
- Suggested publish date
Review the content before approving it.
Check:
- Is the content accurate?
- Does it match your strategy?
- Does it follow the channel plan?
- Does it follow your channel guidelines?
- Is the CTA correct?
- Are internal links relevant?
- Does the post or article sound on-brand?
- Does the content need edits before publishing?
Axy handles the first draft and channel optimization, but you still control what gets published.
Step 3: Edit content where needed
You can edit generated content directly from the Marketing Calendar.
Common edits include:
- Adjusting the hook
- Tightening the intro
- Changing the CTA
- Adding a stronger example
- Correcting product details
- Removing unsupported claims
- Changing tone or length
- Updating internal links
- Adding customer proof or data
- Making founder-led content sound more personal
If you notice repeated issues, update your marketing strategy or channel guidelines. Future content will use the updated context.
Step 4: Review internal links for GEO content
For GEO, AEO, and SEO content, Axy may suggest internal links based on your website index.
These links may point to:
- Product pages
- Use-case pages
- Case studies
- Tutorials
- Comparison pages
- Existing blog posts
- Documentation
- Resource pages
Review internal links before publishing.
Good internal links should be:
- Relevant to the topic
- Useful for the reader
- Naturally placed
- Connected to your content strategy
- Helpful for moving users to the next step
Internal links help each new campaign strengthen your wider content architecture.
Step 5: Approve content
Once a piece of content looks ready, approve it.
Approving content signals that it is ready for the next step in your workflow.
Depending on your setup, approved content may be ready to:
- Schedule
- Publish
- Export
- Share with your team
- Move to your CMS
- Add to a launch plan
If you are working with a team or client, approval can also help separate draft content from final content.
Step 6: Schedule or publish content
From the Marketing Calendar, you can organize when content should go live.
Depending on your setup, you may be able to:
- Schedule LinkedIn posts
- Schedule X posts or threads
- Plan GEO article publication dates
- Coordinate campaign timing across channels
- Spread campaign assets across multiple days
- Save content for later
For cross-channel campaigns, use the calendar to make sure content is sequenced properly.
For example:
- Publish the GEO article first
- Follow with a LinkedIn post
- Share an X thread
- Add follow-up social posts later in the week
This helps one campaign create multiple touchpoints across channels.
Step 7: Manage content status
Use content status to understand what stage each asset is in.
Common statuses may include:
- Draft
- Needs review
- Approved
- Scheduled
- Published
- Exported
- Archived
This helps you quickly see what needs action.
For example:
- Draft content may need editing.
- Approved content may need scheduling.
- Scheduled content is ready to go live.
- Published content can be tracked for performance.
Step 8: Use the calendar to plan your week
The Marketing Calendar can also act as your weekly marketing plan.
Instead of managing content across scattered docs, spreadsheets, and social tools, use the calendar to see:
- What is ready to publish
- What needs review
- Which channels are active
- Which campaigns are scheduled
- Whether your content mix is balanced
- Whether you are over-posting or under-posting on a channel
- Which campaign themes are being repeated
This helps you maintain consistency without manually building a content calendar from scratch.
Step 9: Track what happens after publishing
Once content is published, Axy can use performance data to improve future recommendations.
Depending on the channel, Axy may track:
- AI visibility changes
- Mention rate
- Citation rate
- Search performance
- LinkedIn impressions
- LinkedIn engagement
- X impressions
- X engagement
- Topic performance
- Campaign performance
This performance data helps Axy improve future proposed briefs and generated content.
The Marketing Calendar is not just a publishing view. It is part of the feedback loop.
FAQ
where does generated content go?
Generated content is added to your Marketing Calendar.
This includes content generated from:
- Proposed Briefs
- Custom Campaigns
- GEO article briefs
- LinkedIn briefs
- X briefs
- Product launch inputs
- Case study inputs
- Drafts or source links
From the calendar, you can review, edit, approve, schedule, publish, or export the content.
can I edit content after it appears in the calendar?
Yes.
You can edit generated content before approving, scheduling, publishing, or exporting it.
If the content is already published, you may need to edit it in the destination platform or CMS, depending on your setup.
do calendar items stay connected to the original brief?
Yes.
Calendar items should stay connected to the original brief, signal, or custom input that generated them.
This helps you understand why the content was created and how it fits into your wider strategy.
should I publish everything Axy generates?
No.
Axy gives you campaign opportunities and generated content, but you decide what goes live.
Prioritize content that is:
- Relevant to your current goals
- Aligned with your strategy
- Timely
- Accurate
- Useful to your audience
- Strong enough to publish
Best practices
Review the calendar weekly
Use the Marketing Calendar as your weekly execution view.
Approve before scheduling
Make sure each asset is accurate, on-brand, and aligned with your strategy before it goes live.
Sequence cross-channel campaigns
For larger campaigns, coordinate GEO, LinkedIn, and X content instead of publishing everything at once.
Keep your content mix balanced
Make sure you are not only publishing one type of content. Balance educational, product-led, market commentary, proof-led, and conversion-focused content.
Update guidelines when edits repeat
If you keep making the same edits, update your channel guidelines so future content improves.
Track performance after publishing
Use results to decide what to repeat, refine, or turn into a follow-up campaign.
Recommended next